Friday, December 31, 2010

It's Almost A New Year!

Hello friends!
Tonight we ring in a new year! Yeah!
I think a perfect way to start the new years is to share with you all
my favorite vintage new years card!


I printed this card on cardstock and created this sweet wall hanging around it!


A piece of black chipboard is my background,
 which I then started adding layers upon.


A fun way to add more fun and whimsy to a piece, especially when working with dark colors, is to take a white gel pen and out line everything with little lines to make it look like faux stitches!
This Signo White gel pen is the best gel pen I have ever used! It always writes nice and smooth! I definitely recommend getting the Signo brand!


This wall hanging is now in the etsy shop!

We wish you all a wonderful New Year's Eve!

Lindsey and Twyla

Thursday, December 30, 2010

Happy New Year ~ Postcards

Hello dear friends!
A gift is given to us all, a fresh new year!


I love the feeling that I am able to start anew and maybe do things
a little bit better than I did the last year.
Yes, the usual resolutions, loose weight, exercise more, eat right.
These are all important.


I think I shall also resolve to give more, forgive more, help more
and savor more. 


It is not enough to have good intentions,
I must consiously make the effort each day.

Thank you for being here this year and making it so special!
Happy New Year!
Twyla

Monday, December 27, 2010

Altered Antique Ledger Book

Hello friends!
Today I want to share with you an antique ledger book that I altered!


The paper used for this ledger is from the Circa 1934 collection by Cosmo Cricket.
I love this line! It is such fun paper! I added lots of layers and different textures to the cover of the ledger to make it really dimensional.


The grungeboard swirls and hinges are by Tim Holtz and are inked red with Barn Door Distress Ink. The lovely Ornate bracket design is a die by Tim Holtz.


I also altered the inside cover of the ledger book. I added a kraft envelope to hold small ephemera which is by Maya Road.
This ledger book has 25 pages to fill with memories and photos!


This ledger book is now in the etsy shop!

Wishing you a lovely day, Lindsey

Saturday, December 25, 2010

Merry Christmas and Giveaway Winner!

Merry Christmas!
It is bittersweet to us that another Sugar Kissed Christmas is
ending.  We have enjoyed having each and every one of you
join us.


Today we share some vintage card images with you that
are really sweet.


We are also announcing the winner of our giveaway for the houseshoes!
(Imagine drumroll)  It's Sherry of Country Wings in Pheonix!
Congratulations Sherry!


Have a warm and wonderful Christmas day!
Twyla and Lindsey

Friday, December 24, 2010

Christmas Eve

Hello dear friends!
I want to share with you some postcards that a
dear friend gave me for Christmas this year.  This one is my
favorite.  Of course the pinks and red drew me right in!


The lovely sentiments on the next two, we wish for all of you!


Health and wealth and every good thing;
In fact, may the day be so blessed for you
That you'll be happy the whole year through!


Merry Christmas Everyone!
Twyla and Lindsey

Thursday, December 23, 2010

Sugar Kissed Garland

Hello dear friends!
We have a simple addition to our
Sugar Kissed display.
A garland!


Some inexpensive mittens from Target's dollar section in the perfect
colors and chipboard snowflakes that Lindsey Sugar Kiss glittered!
All held on yarn with child size clothespins.


Today is our third blogoversary!
How quickly the time has gone!  It must be true that time flies
when you are having fun.  It has been a blast these past three years
sharing with you our vintage finds, our craft obsessions and ideas.


Thank you all so much for stopping by now and then and making this so
rewarding.  We love our readers and followers and commenters!


Don't forget that we have a giveaway here!
Wishing you all a blessed and joyous Christmas!
Twyla and Lindsey

Wednesday, December 22, 2010

Christmas ltered Book Tutorial

Hello friends!
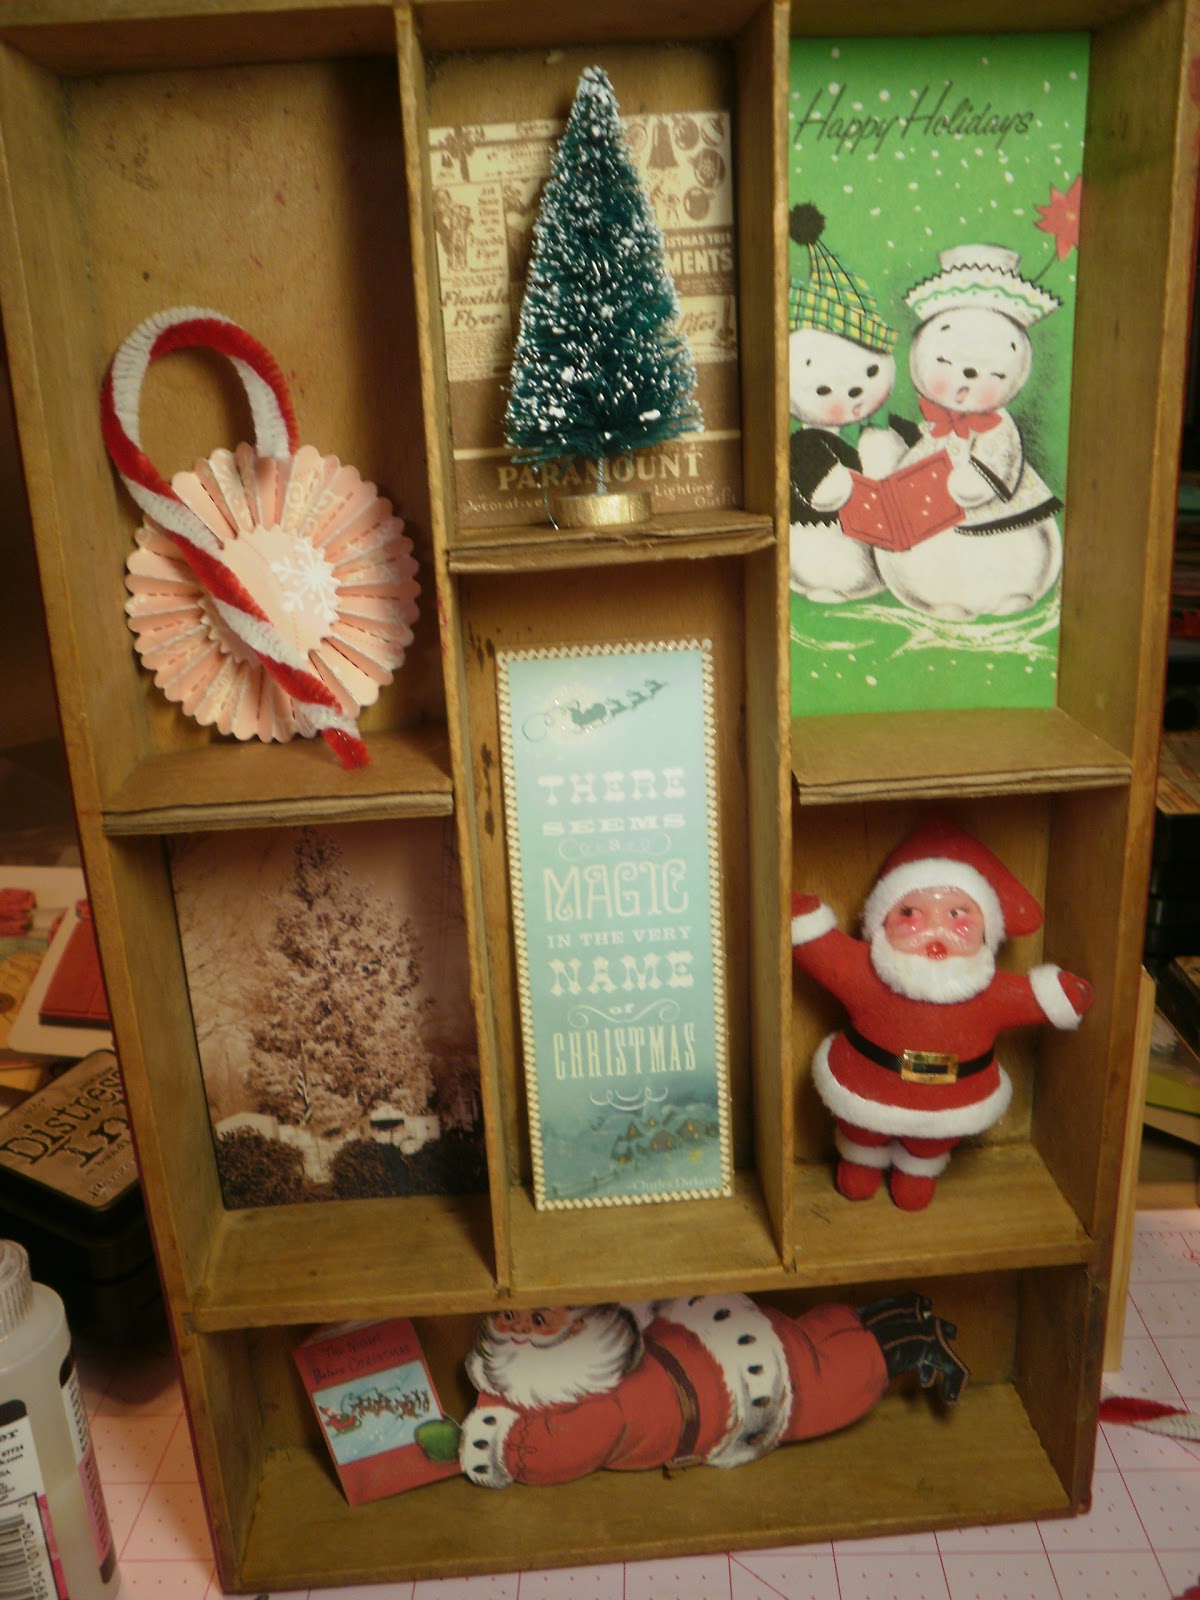
Today we are sharing a tutorial for creating an altered book!


 I picked up cheap books from thrift stores for this project. We are gluing the book together so that you will just have the one 2 page display as the focus. To glue your book together, start by opening your book up half way and glue the first page on front and back to the books covers. Now take sections of the book (about 10 - 15 pages) and staple them together. Repeat this until you have about 3 pages left on both sides at the middle of the book. Now glue together the stapled sections.


Now take those un-glued pages and rip, tear and crinkle them to give your book and old aged look.
Add brown ink around the edges to give it a more vintage look.


Now I want to give this book a fun look so I am adding drops of Christmas colors across the pages.
To achieve this look, take watered down paint or Distress ink Reinkers which I am using in your desired colors. Pour a little bit of the color liquid in the palm of your hand and just let it fall onto the book in random spots. You can add a little Perfect Pearl shimmer powder to your liquid to make the splatters sparkle.


Add 2 to 3 colors and let dry.


Now the fun part! Going through your stash and picking out embellishments to cover your book.
These chipboard stickers are by Cosmo Cricket.


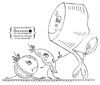
I have been saving this sweet Sugar Kissed vintage sewing pattern image to use this year and just love how she looked on the book!


Here is the pattern so that you can use her for your own sugar kissed projects!


I took pink and red pipe cleaners and twisted them to create a festive border that I glued across the top and bottom of the book.


The scrapbook paper that I used on this project is by
October Afternoon from their Very Merry line.


It truly is fun to alter books and I hope you give it a try!

Wishing you a wonderful Wednesday,
Lindsey

Tuesday, December 21, 2010

Another Giveaway and A Sugar Kissed Idea

Hello friends!
Christmas is coming so quickly and we just aren't ready to have
another Sugar Kissed Christmas behind us.

Another gift we'd love to give away this Christmas is a pair
of my knitted houseshoes!


I've made a pair in red and white!  So warm and cozy to
keep your feet warm during the cold winter months.
All you need to do is leave a comment on this post
and we will announce the winner Christmas Day!


We also want to share with you today a fun way to print and display vintage Christmas images!
I found this sweet card in my collection and new it would be perfect!


Print your vintage images on song sheet music for this cool effect!
I used a basic inkjet printer for printing.


I love how the image blended in to the sheet music so well!


Try this cool technique and see what you can create!

Wishing you a lovely day, Lindsey and Twyla

Monday, December 20, 2010

Christmas Shadow Box

Hello friends!
Today I wanted to share with you a Christmas shadow box I created
 using a vintage silverware drawer!


Start with an old silverware drawer which can be found at thrift or antiques stores.
My drawer was already the perfect color of red but you can paint your drawer to match your theme.


I wanted to create more sections for my shadow box so I cut pieces of cardboard down to fit into the drawer. Now whats really nice about that is being able to make the sections as long or short as I want for making the perfect customized shadow box.


Now comes the fun part! Collecting pieces for your shadow box! I had fun looking through all of my Christmas supplies finding small things that I wanted to add!


Now you can paint or cover the edges of the drawer. I used Tim Holtz Tissue Tape that had a snowflake pattern to cover the edges. It looked really good and being adhesive, it was a really quick an easy way to cover the edges. Decide what paper you want in each of your sections and glue down. Once you have glued the paper to the cardboard inserts, you can add glue along the back edge and glue them to the drawer. I used Aleene's Craft Glue for a good secure hold.


Now you can just keep adding and layering until you achieve your desired look!


The scrapbook paper used for this shadow box is by October Afternoon, from the Very Merry line.
This cute image below and a few of the others is from an ephemera pack by K & Company. You can find the pack at Hobby Lobby. The vintage Santa was purchased from an Antique shop.


The "25" bingo wooden number is by Maya Road and comes in a full set of numbers in black or red. The Bottle Brush tree was also purchased at Hobby Lobby.


Here are the 2 vintage images used for this shadow box.


Wishing you all a lovely start to the week!

Lindsey